Hydroponics Systems

1. Hand Watered Bucket
2. Water Culture System
3. Ebb and Flow System


free1.gif (5195 bytes)   HAND-WATERED BUCKET

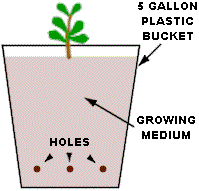
This inexpensive system is one of the Professor's favorites. It is probably the simplest hydroponic system on the planet. Simple yet effective, we have seen very impressive results achieved with this easy to build system. The series of holes that ring the bucket are about 1 1/2" inches above the bottom, this makes a small reservoir of nutrient solution in the bottom that will be wicked up to the plants roots by the capillary action of the growing medium.

hydroponic systems are perfect for large plants, it can easily handle a single tomato or pepper plant or a couple of smaller plants like lettuce or herbs. NOTE: With large plants you may need to supply external support to help hold the plant upright.

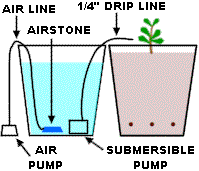
hydroponic systems can be automated with the use of a separate reservoir, submersible nutrient pump, a short cycle timer (one that can be set to come on for as short as a minute), an air pump & airstone as well as a little bit of drip irrigation tubing. (See drawing on left)

free3.gif (6279 bytes)   

Hydroponics Materials Required:

opsommingsteken

5 GALLON BUCKET (or equivalent water tight plastic container). Make sure that the bucket doesn't have any leaks in the bottom, it is important that the bucket holds water up to the point of the overflow holes..

opsommingsteken

GROWING MEDIUM - The Professor favors straight Perlite or a Perlite / Vermiculite mix for this system, however there is a vast variety of growing mediums that will work well.

opsommingsteken

FIBERGLASS WINDOW SCREEN (optional) - A small amount of window screen is handy to put over the overflow holes that you must drill in the bucket, this helps keep the growing medium from falling out.

opsommingsteken

HYDROPONIC FERTILIZER * - A good quality hydroponic fertilizer is required, regular "dirt" fertilizers do not contain essential "micro-nutrients".

opsommingsteken

pH TEST KIT *- You will need some way of checking and adjusting the pH of your nutrient solution.

ASSEMBLY OF HYDROPONIC SYSTEM

  1. Drill a series of holes in a CLEAN plastic bucket approximately 1 1/2" (4 cm) above the bottom of the bucket. The number and size of the holes is not critical, usually 6 to 10 holes (3/8" or 1/2" in diameter) is enough. NOTE: Holes smaller than 3/8" seem to plug up easily. The larger the hole the more likely that you will need step # 2 below. Very large holes will dry out the growing medium quickly.

  2. Optional: From the inside of the bucket place window screen over holes. (you can hold the screen in place as you add the growing medium, or you can glue the screen in place with a small amount of silicone sealant, wait for silicone to cure before adding growing medium). NOTE: The screen is just to keep the growing medium from falling out. If you don't mind a little mess, or if your holes are relatively small, or your growing medium stays together well you can skip this step.

  3. Add the growing medium to the bucket. (NOTE: you will need to wash and / or pre-soak the growing medium before adding to the system, depending on the type of growing medium that you are using. 

  4. Plant your seedling, rooted cutting or seed in the growing medium. NOTE: The Professor recommends starting your seeds separately and then adding the seedling(s) to the system.

CARE AND FEEDING INSTRUCTIONS
Hand Water Version

  1. Mix your nutrient solution as per the instructions on the fertilizer package. Check pH and adjust accordingly. NOTE: The required pH value will vary depending on the requirements of the plant and the kind of growing medium. An easy way to mix the nutrient is to use a one gallon milk jug and mix a gallon at a time, however it can be convenient to mix more than a gallon at a time, you can use another 5 gallon bucket (or similar plastic container). If you mix large amounts at a time it is recommended that you aerate the surplus nutrient solution with an aquarium type air pump and airstone to keep the solution from stagnating. Storage container should have a loose fitting lid to keep out debris.

  2. Slowly add the pH adjusted nutrient solution to the bucket until you see some excess flow out of the overflow holes.

  3. Repeat step #6 periodically as needed. This will vary due to weather conditions and the size and type of plant(s). Knowing when and how much to water requires a little trial and error.

CARE AND FEEDING INSTRUCTIONS
Automated Version

  1. Fill the reservoir with water and mix your nutrient solution as per the instructions on the fertilizer package. Check pH and adjust accordingly. NOTE: The required pH value will vary depending on the requirements of the plant and the kind of growing medium. 

  2. Attach the drip line to the submersible pump and put the pump into the reservoir. Plug the pump into the timer. Set the timer and plug it into the outlet. NOTE: You will need a short cycle timer that can be set for short periods of time. A digital timer from a home center usually will work as they can be set to come on for as little as one minute. A good starting point to set the timer is to come on for one minute once or twice a day.

  3. Put the drip line so that the nutrient solution runs out at the base of the plant.


free4.gif (4900 bytes)

WATER CULTURE
SYSTEM

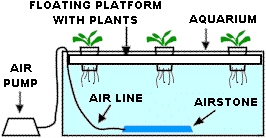
Convert an aquarium into a simple hydroponic system. The plants are suspended on a floating Styrofoam platform. This hydroponics system is popular for classrooms because the roots of the plants are visible hanging below the floating platform.

Materials Required:

opsommingsteken

AQUARIUM - Any water tight container with fairly vertical sides will work. Light breaks down the nutrient solution and encourages algae growth so if you us an aquarium you will need to construct a light shield out of cardboard or aluminum foil to keep light out of the reservoir (aquarium). If you wish to view the roots make the light shield (or part of it) removable.

opsommingsteken

FLOATING PLATFORM - You will need a piece of Styrofoam 1 1/2" to 2" thick. Cut Styrofoam to fit loosely inside the aquarium (or whatever you are using for a reservoir).

opsommingsteken

PLASTIC CUPS - Use several small plastic or Styrofoam cups to hold the plants on the floating platform. (NOTE: We usually use Solo brand 3oz. plastic bathroom cups, but you can use any small plastic cup as long as it has tapered sides).

opsommingsteken

GROWING MEDIUM - You will need a small amount of growing medium, enough to fill the plastic cups. (NOTE: The Professor recommends using Perlite or a perlite / Vermiculite mix for the growing medium).

opsommingsteken

AIR PUMP AND AIR STONE - You need to use an air pump and airstone to oxygenate the nutrient solution. A regular air pump designed for an aquarium is all that is required.

opsommingsteken

HYDROPONIC FERTILIZER * - A good quality hydroponic fertilizer is required, regular "dirt" fertilizers do not contain essential "micro-nutrients".

opsommingsteken

pH TEST KIT * - You will need some way of checking and adjusting the pH of your nutrient solution.

ASSEMBLY OF SYSTEM

  1. Cut the Styrofoam float to fit the reservoir. Cut the float a little smaller than the opening so that it won't bind up when the water level changes.

  2. Cut the holes in the float to the proper size for the plastic cups that you are using, you want the bottoms of the cups to hang below the bottom of the float but not fall through. (NOTE: We usually use Solo brand 3oz. plastic bathroom cups, these require a 1 7/8" to 2" hole.

  3. Cut several holes (aprox. 1/8"  to 1/4" dia.) in the bottom of your plastic cups. Add growing medium to the cup (NOTE: if the growing medium falls out through the holes you can put a small piece of fiberglass window screen or small piece of cloth over the holes before adding the growing medium.

  4. Plant your seedling, rooted cutting or seed in the growing medium.

CARE AND FEEDING INSTRUCTIONS

  1. Fill the aquarium (reservoir) with water. Mix your nutrient solution as per the instructions on the fertilizer package. Check pH and adjust accordingly. NOTE: The required pH value will vary depending on the requirements of the plant.

  2. Attach 1/4" airline to the air stone and place airstone in reservoir. Attach free end of tubing to air pump and plug in air pump to outlet, make sure that there are bubbles coming from the air stone. (NOTE: NEVER submerge the air pump in water as electrical shock could occur).

  3. Place floating platform on top of the nutrient solution. Put plastic cups into the holes in the floating platform.

  1. When the plants have used up about half of the nutrient solution you can add WATER ONLY to bring the level back up (do not add fertilizer or you could cause a nutrient build up that could harm the plants). Recheck pH and adjust if necessary.

  2. When the plants have used half of the nutrient solution for the second time you need to change out the nutrient solution by draining the reservoir and then mix a fresh batch. Use the old nutrient solution on house plants or other vegetation.


free2.gif (9187 bytes) EBB & FLOW SYSTEM
(FLOOD AND DRAIN)

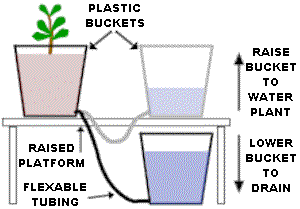
This hydroponics system uses two 5 gallon buckets (or equivalent), one filled with growing medium and the other holds the nutrient solution.

The plants are watered by lifting the bucket containing the nutrient solution, this allows the nutrient solution flows into the bucket containing the growing medium and Plant(s). To drain, simply lower the nutrient bucket and gravity drains the nutrient solution back into the reservoir (see drawing on left).

Materials Required:

opsommingsteken

2 - 5 GALLON BUCKETS (or equivalent water tight plastic container). Make sure that the buckets don't have any leaks.

opsommingsteken

GROWING MEDIUM - The Professor favors straight Perlite or a Perlite / Vermiculite mix for this system, however there is a vast variety of growing mediums that will work well.

opsommingsteken

FLEXIBLE VINYL TUBING - You need a length of flexible tubing long enough for the buckets to be moved as in the drawing above (3 or 4 feet is usually enough).

opsommingsteken

FIBERGLASS WINDOW SCREEN - You will need a small amount of fiberglass window screen (12" x 12").

You will need a small amount of fiberglass window screen (12" x 12").

opsommingsteken

GRAVEL - You will need enough gravel to cover the bottom of your growing container approximately 2 or 3 inches. Use a fairly coarse gravel ( 3/4 to 1 inch diameter). NOTE: A 5 gallon bucket needs about a gallon of gravel to reach this level.

opsommingsteken

HYDROPONIC FERTILIZER * - A good quality hydroponic fertilizer is required, regular "dirt" fertilizers do not contain essential "micro-nutrients".

opsommingsteken

pH TEST KIT *- You will need some way of checking and adjusting the pH of your nutrient solution.

ASSEMBLY OF SYSTEM

  1. Drill holes in the CLEAN plastic buckets on the side approximately 1/2" above the bottom of the bucket. NOTE: The size of the holes will depend on the size of the tubing that you use. We suggest that you use 1/2 " i.d. tubing,for this you will need to drill a 1/2" hole.

  2. Insert tubing into the holes of both buckets approximately 2". Test the assembly for leaks by placing the buckets side by side and filling with water. (NOTE: The tubing should fit tightly so that their are no leaks, if you do have a leak from where the tubing connects to the bucket you can seal it from the inside of the bucket with some R.T.V. "Silicone" sealant, if you use silicon follow the directions on the packaging and allow the sealant cure overnight before proceeding to step #3).

  3. Empty the water out of the assembly and place the gravel into the bottom of one of the buckets. This will be the Planter, the other bucket will be the reservoir.

  4. Place the window screen over the top of the gravel. Fold the excess over or you can trim the screen with a pair of scissors. The screen acts as a filter to keep the growing medium in place. So try to fit the screen as close to the sides of the bucket as you can. You don't have to have a perfect fit, but the better the screen fits the less growing medium will get washed into the reservoir when you drain the system during the "Ebb" cycle. In fact if too much growing medium gets through the screen it can actually clog the fill/drain tube.

  5. Add the hydroponic growing medium to the bucket. (NOTE: you will need to wash and / or pre-soak the growing medium before adding to the system, depending on the type of growing medium that you are using.

  6. Plant your seedling, rooted cutting or seed in the hydroponic growing medium. NOTE: The Professor recommends starting your seeds separately and then adding the seedling(s) to the system.

CARE AND FEEDING INSTRUCTIONS

  1. Put the planter on the platform* and leave the reservoir in the "lowered" position.

* TIP: If you don't have a platform there is an easy way to make one: Stand two standard masonry blocks on end and place a board big enough to hold both buckets on top.

  1. Fill your reservoir with water and mix the nutrient solution as per the instructions on the fertilizer package. Check pH of the nutrient solution and adjust accordingly (NOTE: The required pH value will vary depending on the requirements of the plant and the kind of growing medium. Cover the reservoir with a loose fitting lid to keep out debris. It is a good idea to aerate the nutrient solution with an air pump and air stone to keep it from stagnating.

  2. To feed and water your plant(s) simply lift the reservoir bucket and set it on the platform next to the planter bucket. Wait a few minutes and then lower the reservoir back down. CAUTION: a full 5 gallon bucket weighs about 40 pounds, if you can't lift that much make smaller amounts of nutrient solution.

  3. Repeat step #9 periodically, how often you need to do a watering cycle depends on several variables, size and type of plants, type of growing medium, weather conditions, etc., making watering cycles a bit of a guessing game, however with this type of system it is hard to over water so when in doubt...DO IT.

  4. Check the pH of the nutrient solution every couple of days and adjust if needed.

  5. When the plants have used up about half of the nutrient solution you can add WATER ONLY to bring the level back up (do not add fertilizer or you could cause a nutrient build up that could harm the plants). Recheck pH and adjust if necessary.

  6. When the plants have used half of the nutrient solution for the second time you need to change out the nutrient solution by draining the reservoir and then mix a fresh batch (as per step #8 above). Use the old nutrient solution on house plants or other vegetation.


HYDROPONIC GROW GUIDE FOR